Pricefalls.com Integration Guide
Prerequisite to sell product through Pricefalls
1. Create Pricefalls seller account
2. Install ExportFeed
Steps to create product feed for Pricefalls
1. Create Feeds Page
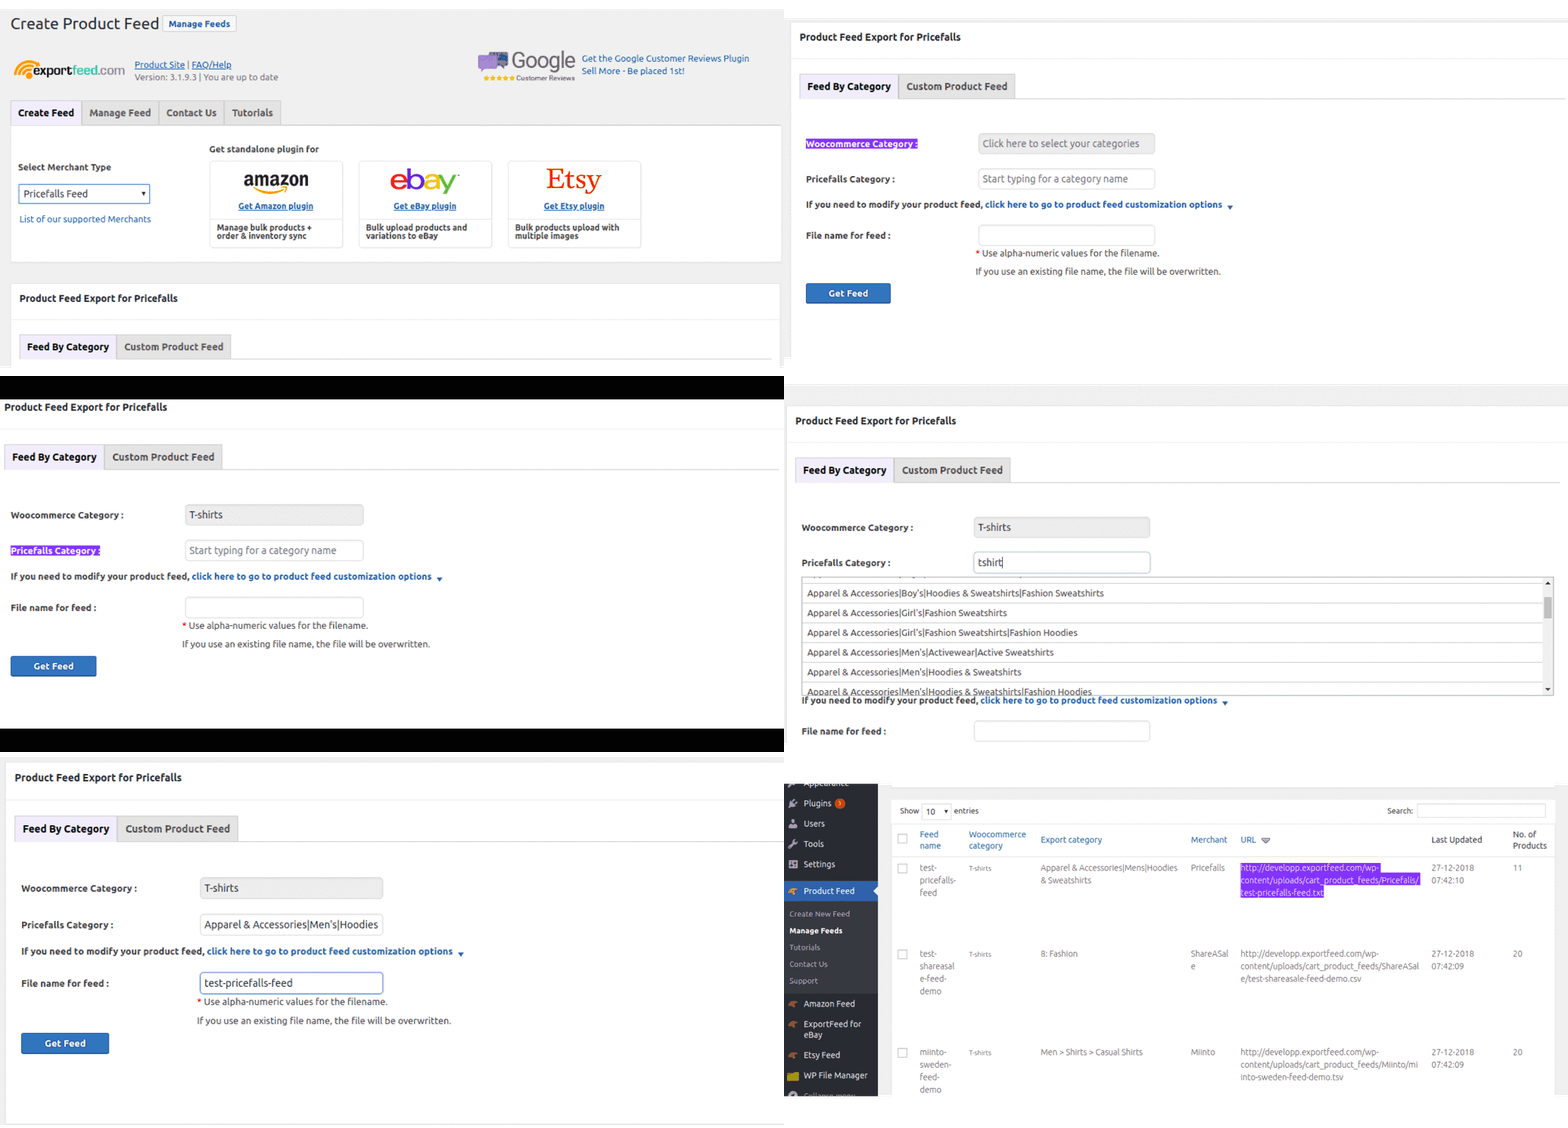
To start creating feeds, click the Product Feed sub-menu on the WordPress Admin’s left navigation bar.
2. Select Merchant Type
Choose PriceFalls Feeds in the merchant selection dropdown. To create product feed for other merchants, please see a full list of our support channels
3. Select the WooCommerce Category you wish to export.
Note: Selecting a parent category automatically includes all of it’s child categories/
Click the field beside “WooCommerce Category” to select from a list of WooCommerce categories
(1). A small box will appear with a list of categories to export
(2). If you do not see anything, please see FAQ – No Categories.
4. Select the Merchant Category or Template
Start typing a category that closely matches your products. For a list of categories, see Merchant Category Lists
5. Name Your Feed
To easily manage your feeds (view/edit/delete) later, enter a name for your feed. Generated feeds can be found from Product Feed > Manage Feeds.
8.Get Feed
Generate the data feed by clicking “Get Feed”. You will receive a notification message along with the link to view or open your product feed file in the new tab.
- To view your XML feed: right-click and select ‘view page source’
- To view a CSV or TXT feed: save the feed (ctrl+s or cmd+s) and open the file via a spreadsheet software (Excel
You can also grab the URL of your product feed for Pricefalls from the Manage Feeds section of the plugin.
9.Submit your feed
Submit the feed URL or upload feed to Pricefalls
Integration Guide Summary
There are five steps to effectively manage your inventory using data feeds.
1. Creating your Pricefalls seller account – Set your shipping model is compulsory
2. Prepare your product feed for pricefalls
3. Complete your Datafeed Manager settings
4. Verify your Datafeed Schedule on Pricefalls
5. Reviewing your product listing results
To check more details about Pricefalls data feed integration:- PRICEFALLS DATAFEED INTEGRATION GUIDE
Optional Step: Mapping Required Attributes
It is possible that you may not have entered the product attribute values required by the merchants. If so, you will need to create that through the Attribute mapping section under product customization options.
- Mapping your local (WooCommerce based products) attributes or setting static values for required merchant fields is the most important step in creating successful data feeds.
- The plugin automatically detects and maps most of your local attributes (title, description & images for example), but in some cases manual mapping is required (size, gender, color). Continue on to step 5 and generate a feed. Return to this step if you are missing any attributes or values.
- To meet Merchant requirements, you will first create local attributes (if you haven’t already) and then map them to Merchant ones.
Each Merchant has their own strict set of required attributes – they are shown in the plugin’s attribute table (below screenshot).
You can also see required attributes here.
Use the drop down menus to select your desired mapping (the plugin automatically maps some for you). WooCommerce Attributes are created via Products > Attributes. You can also map attributes using the Advanced Command box.
If you feel the need of our help, please feel free to contact us.


