Newegg Integration Guide
Prerequisites to list on Newegg & Integration Guide
1. Create Newegg seller account
2. Install ExportFeed
If you are selling products Exporting data feeds to Newegg has now become easier. With ExportFeed you can get data feed in any of these file formats: XLS, CSV, TXT, XML
Steps to create product feed for Newegg
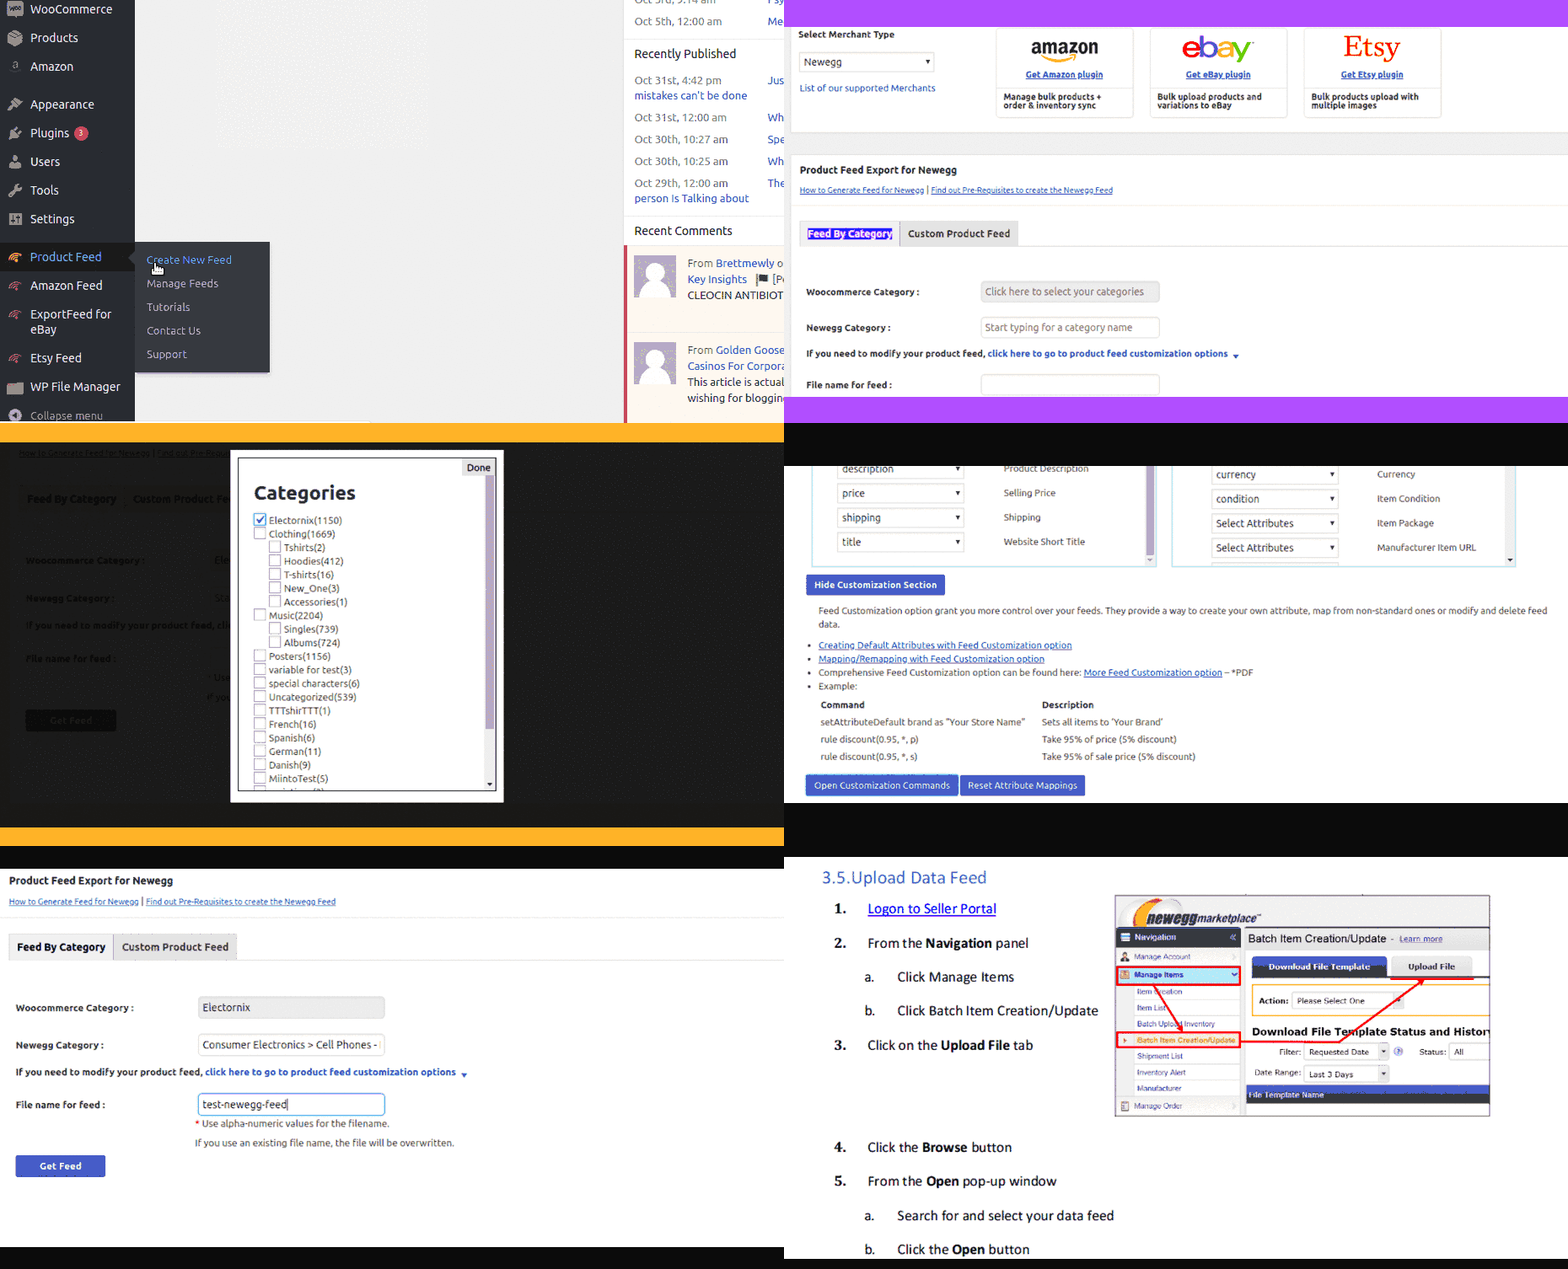
1.Go to Create Feed page
Select Product Feed plugin and click on the Create Feed sub-menu on the left admin panel of your WordPress.
2.Select Newegg
On the Create Product Feed page, select Newegg as the Merchant Type for which you are creating your product feed.
3. Select your WooCommerce product category
As Newegg is more popular for selling electronics items, select the product category of your WooCommerce that you want to sell through Newegg.
4. Selecting Corresponding Newegg Category
After selecting your WooCommerce category, you need to select the corresponding category on Newegg. The products of your WooCommerce should belong to the category you select for Newegg for a proper listing benefits.
5. Enter your shipping details
Click on the open product feed customization options link and then check the product attribute mapping. This is automatically handled by the ExportFeed plugin and app. Then click on the Open Customization Commands button and add your shipping information for products you are selling through Newegg.
$newegg_shipping = Free
(In place of “Free”, you can use any shipping method you use.)
After entering the shipping info through commands, click on the update button.
6. Finalize creating your Newegg product feed
Now, click on the Get Feed button. You will receive a notice and a link to view Newegg product feed file. You can open that file in the browser and save to upload to Newegg.
Newegg Requirements
- Detailed feed instructions can be found here
- There are a total of 13 required fields (see the table below). Please ensure your e-commerce webshop contains data for these mandatory fields.
- In the table below is a list of attributes that the plugin maps automatically; you may need to map or create attributes yourself if the values are not found.
| Newegg Attribute | Required? | Default mapping (or value) | More information |
|---|---|---|---|
| Seller Part #* | Yes | sku | By default, SKU is mapped to Seller Part# but if you need to change the mapping, you can do it from the drop-down. |
| Manufacturer* | Yes | brand | Manufacturer here resembles brand or the producer. |
| Manufacturer Part #/ISBN* | Yes | There is no default mapping for this attribute. You need to map it to ISBN. | |
| UPC* | Yes | Barcodes can be mapped to UPC. There is no default mapping for this attribute. You can map the available attributes: EAN/UPC | |
| Inventory* | Yes | Website Long Title | |
| Item Length* | Yes | length | |
| Item Width* | Yes | width | |
| Item Height* | Yes | height | |
| Item Weight* | Yes | weight | |
| Product Description* | Yes | description | |
| Selling Price* | Yes | price | |
| Shipping* | Yes | shipping | Go down to “advanced commands” box and add this command: $newegg_shipping = Free (In place of “Free”, you can use any shipping method you use.) |
| Website Short Title* | Yes | title | |
| Action | Yes | Action | “Create Item”, “Update Item”,”Update Item Price and Inventory”, “Update/Append Image”, and “Replace Image” |
| Item Images | Yes | feature_imgurl | The URL or address of the images of your products. |
| These fields are not required but auto-populated if the attribute is available | |||
| Activation Mark | |||
| Age 18+ Verification | |||
| CheckoutMAP | Recommended | ||
| Choking Hazard 1 | |||
| Choking Hazard 2 | Highly Recommended | ||
| Currency | Recommended | currency | |
| Item Condition | Recommended | condition | |
| Item Package | Recommended | ||
| Manufacturer Item URL | |||
| MAP | Optional | Minimum Advertised Pric | |
| MSRP | Optional | ||
| Prop 65 | Optional | ||
| Related Seller Part # | Recommended | ||
| Shipping Restriction | |||
| Website Long Title | |||
Upload your Newegg Feed
The following are the steps to upload Newegg feed:
- Logon to Seller Portal
- From the Navigation panel
a. Click Manage Items
b. Click Batch Item Creation/Update - Click on the Upload File tab
- Click the Browse button
- From the Open pop-up window
a. Search for and select your data feed
b. Click the Open button - Click on the Upload button
- Check feed status under Uploaded File Status and History
See Newegg Data Feed Specifications for full details.
If you have any questions regarding listing your products on Newegg, please feel free to contact our support team.


